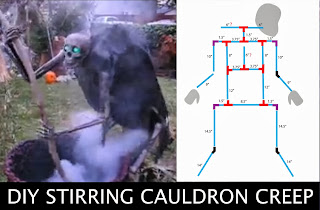
After searching the web I found the best looking DIY stirring animated Halloween prop at Haunt Forum. The stirring motion is very realistic.
It also included a link to figure out how to use windshield wiper motors salvaged from old cars, or bought online. This guide didn't provide any measurement but i found some in this video, but they were not quite complete. I drafted this diagram to help me better figure out the different cuts and parts needed for the body. They are all done in 1/2 inch pvc pipe, with 1/2 inch joints. I originally just screwed the pipes together, but this did not work, and the frame was constantly sagging. You absolutely must glue them together using the PVC glue, and the primer liquid. Click the image to make it bigger.
If you're not really ready to try your hand at wiring up a windshield wiper motor, you can try using an old record player instead... and try it out kind of like this...A small nail in the end of the stick acts as a pivot when the turntable is switched on. (except i would add a pvc end cap as a cup and just put the stick inside, not attached)
*update* I finally got around to fixing up a wiper motor into the cauldron. I got one from a scrap yard for about $10. You can also buy them new at places like 'Princess Auto'. I used a fence bracket ($8) to mount it to a piece of wood, plus 4 of those little angle metal thingies ($2). I got these all at HomeDepot or Lowes.
To get it all mounted I had to drill new holes in the metal fence bracket (need a drill and bit). Then insert nuts and bolts to the side($4-$8,, i forget), and on top it required 3 machine screws (about $4). (also from the Depot) I recommend bringing in the motor and testing out the screws to get the right ones. I asked the guy for help because I was hard to find the screws I needed in the massive area, they were actually in a drawer.
After I got this mounted I added a piece of metal bar to the top. Most tutorials say to use aluminum stock cut to size. I used about a 6" metal bar bracket thing (with pre-drilled holes, used to reinforce pieces of wood together, was only about $4, as opposed to the $13 piece of aluminum) I got in the same spot as the metal bracket angle thingies. Looks like this thing here....
Then on one end of this metal bracket I used a nut and bolt stuck into the bottom of a pvc end cup, (the stick just sits in it). At this point I powered the motor with a 12v 1.5amp power supply... I can use a computer power supply as well. I got mine from Value Village.
You have to slice the wires and add them tot he outputs on the motor.. I bought special end pieces for the wires... 3/16" crimp-on connectors, (no soldering required). Also available at Lowes HomeDepot or Radio Shack etc.
These are the 2 pins I plugged into. This makes the motor set on the lowest speed. Doesn't mater which wire is which since reversing the wires just makes the motor spin in the reverse direction.
At this point I was feeling so proud of myself until I realized that this motor spun WAY too fast to be looking like is was being stirred by hand. I poured over all the options for slowing down a motor, some where $30 'pacemaker' electronics and I was horrified with this price. I was going to try soldering in a resistor, but I was baffled at which one I needed. Until I found and bought this helpful little part from ebay for $3.50)....
I had a really hard time wiring this up to work right and at first I thought it didn't work, only regulated between 12v and 24v, but apparently my husband had a go at writing it up and got it working right, so it can drop the speed down to 5v. (I might add he knows even less about electronic then I do, which like practically nothing, haha) This little thing I wired between the power supply and the motor, and you can use the little knob to change the speed of the motor.
Here are some link to other people who made this prop ...


